

Tag Tutorial created by ®ivice2006
Last Updated: May 2017
Nivel: Intermedio.
Tools: PSPX and Animation Shop3.
Targeting: Gradients and blending modes.
All materials included *
Tested in other versions of PSP incluiding , CorelPSPX7
..:: TERMS OF USE :
The materials I used belongs to the artist who created,
Please don’t change the name or use them for your own tutorials.
..:: MATERIALS ZIP
Donwload here♥
- Tube Olga Tañon – by Pza Leia
- Bling trail heart – by Ronnie
- Diamond Chain- by ivice
- Paperback – by ivice
- ButterflyWings
- Md_background
..:: STEPS
Open these tubes in PSP:
Olga_tube ,ivice_Paper back, butterfly_wings and md_background
1..:: Create a new transparent image 500×450 pixels
2..:: Set the color palette with
FOREGROUND #775860
BACKGROUND # 000000
3..:: Make a Foreground/Background gradient Style: rectangular
and Flood fill the image with it using this settings:
ANGLE : 164
REPEAT : 0
STYLE : RECTANGULAR
HORIZONTAL: 73
VERTICAL: 37
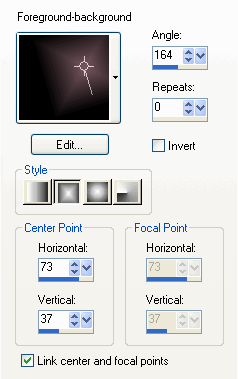
(or you could import my custom gradient included in the zip)
4..:: LAYERS –> add new layer
SELECTIONS –>SELECT ALL
5..:: Copy and paste INTO SELECTION “ivice_paperback”
and low OPACITY at 13%
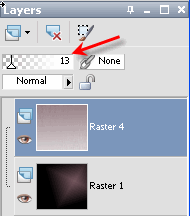
6.:: With selection still running add LAYER—>add NEW LAYER
Copy and paste INTO SELECTION “md_ background.jpg”
and set BLEND MODE TO OVERLAY

7..:: SELECTIONS–>SELECT NONE
Copy and paste AS A NEW LAYER tube “butterfly wings”
Change blendmode to Luminance Legacy–>set opacity at 50

8..:: Copy and paste AS NEW LAYER “Tube Olga Tanon_psd “
Resize at 75% –>Resample Smart Size
This is what we have until now

9.:: Activate layer “md_Background.jpg” and using ERASER TOOL (80%)
Let’s make a few clicks in the areas where the background is showing too much
to bring back the wings texture.
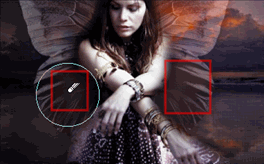
10..:: Activate “Tube _layer” and
EFFECTS–>DROP SHADOW with the following settings
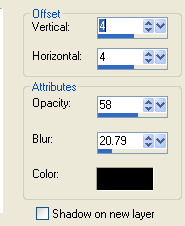
11..:: Let’s repeat Shadows to the tube, but this time
change offset vertical and horizontal to -4
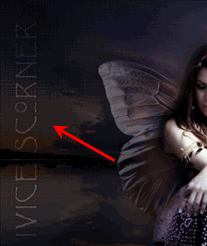
12..:: Add a text of your preference
I’m using Font Ragged –>size36–>vector mode and this colors
FOREGROUN #775860
BACKGROUND #ffffff

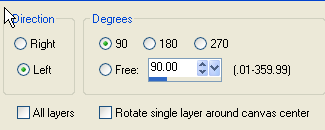
13..:: MENU IMAGEN –>free rotate
whit this settings
14..:: Blend mode to overlay
15..:: MERGE–>MERGE VISIBLE
16..:: In the colors palette change
FOREGROUND #775860
BACKGROUND #000000
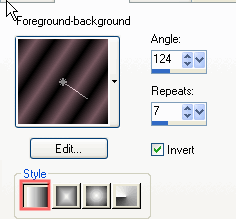
17..:: Make a foreground/background gradient with the following settings
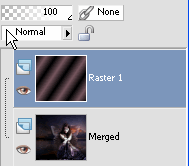
18..:: Layers–>ADD NEW LAYER and FLOOD FILL with the gradient
19..:: SELECTIONS–>SELECT ALL
20..:: SELECTIONS–>CONTRACT –> 4
21..:: Hit DELETE key in your keyboard
and this is what we have
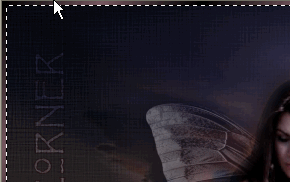
22..:: SELECTIONS–>SELECT NONE
23.:: EFFECTS–>EDGE EFFECTS –>ENHACE
24..:: LAYERS–>MERGE VISIBLE
and save as PSP Animation shop file
ANIMATION SHOP 3
1.:: OPEN file in Animation Shop and duplicate until we have 16 frames
2..:: OPEN “ivice_diamondchain”
COPY AND PASTE all frames over the tag
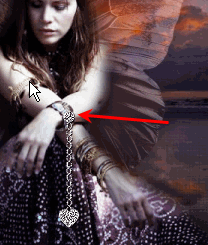
3..:: OPEN “bling_heart trail ” and delete the first frame
(The black frame)
4..:: COPY AND PASTE all bling-bling frames over tag
right there where I’m showing you .
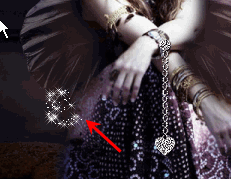
5..:: Set frame properties to 20
MENU–>ANIMATION–>FRAME PROPERTIES
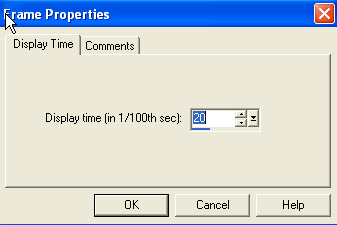
Save as a GIF file, and is Done!

If you would like to share your results with me,
You are more than welcome to post it in my
FACEBOOK PAGE
loVE iS tHe WaY :)
![]()

 English
 Spanish
 Dutch
Dutch
0 comments
No comments yet