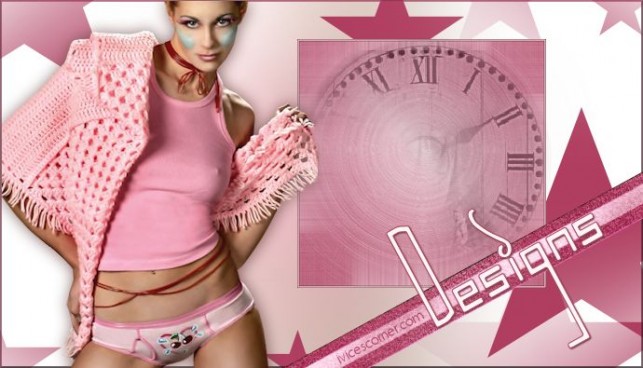
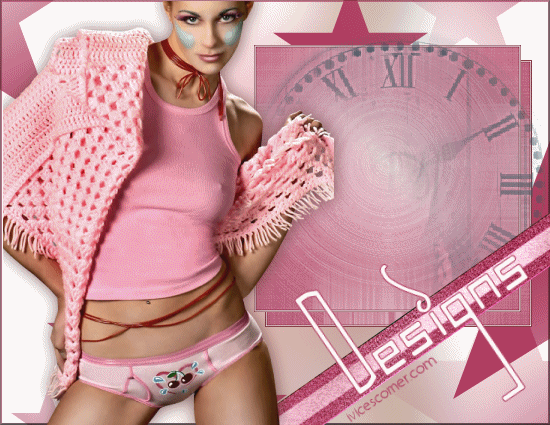
Tag Tutorial created by ®ivice2006
Last Updated: May 2017
Nivel: Advanced
Tools: PSP10 and Animation Shop3.
Targeting: Layers manipulation.
All materials included *
Tested in other versions of PSP incluiding , CorelPSPX7
..:: TERMS OF USE :
The materials I use belong to the artist who created,
Please don’t change the name or use them for your own tutorials.
..:: MATERIALS ZIP
Donwload here♥
- Tube- MichaelRosenCandyGirl-TubedByTYA
- Accents- ¦ò SM ò¦ DarnPinkStars overlay stars
- Tip Brush -Yoka-les-Irina-uurwerk
- Gradient- ivicescorner_pinkhour
Download PLUGIN Ecsw Tile Maker HERE
Download font Incarnation from HERE
Save tubes in a folder of your choice.
Install Tip brushes and Gradient in your PSP folder for them.
****IMPORTANT
TIP: To make this tutorial easier to follow it’s recommended to name
all our layers .Examples of my layers palette will be posted .
..:: STEP 1
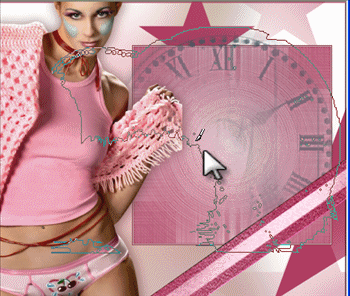
Open tube “MichaelRosenCandyGirl” and
“DarnPinkStars overlay stars” in PSP
1..:: Open New transparent Raster Layer 350×350 pixels
2..:: In the color palette set this colors:
FOREGROUND #b24264
BACKGROUND #ebcfd7
3..:: And convert to Gradient with the following settings

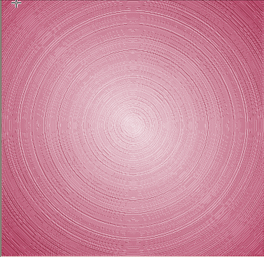
4..:: We apply the Script:
MENUBAR–>VIEW–> TOOLBARS —>Script–>Fine reticulate
![]()
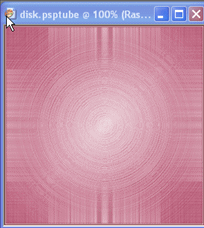
5..:: The script will run itself, once is finish this is what we will have:
6..:: LAYERS–> MERGE LAYERS VISIBLE
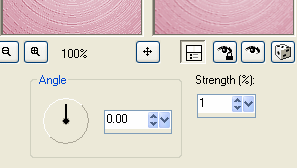
7.:: MENU–> ADJUST–>BLUR–>MOTION BLUR
8..:: MENU—> EFFECTS–> PLUGINS–> TILE MAKER
With these settings:

9.:: We’ll add a triple border like this:
MENU–>IMAGE–> ADD BORDER
-Border 1 , color #853a46 , simétrico, 1 pixel.
-Border 2, color #ebcfd7 , siméetrico, 1 pixel.
-Border 3, color #853a46 , simétrico, 1 pixel.
Until we have a very subtle border:
10..:: Right click with the mouse over this background layer
and —>DUPLICATE LAYER
11..:: Select duplicated layer
MENU —>IMAGE–> FLIP HORIZONTAL
12..:: IMAGE—>RESIZE BY 75%
13..:: Save layers as they are as Animation shop *psp file
Name it : “PINK SQUARE” so we can easily follow the steps below,
without getting confuse.
14..:: Once is saved, Keep it open in Paint shop pro, we’ll use it later.
..:: STEP 2
1..:: Open a NEW RASTER LAYER , 550 x 425 pixels, color White.
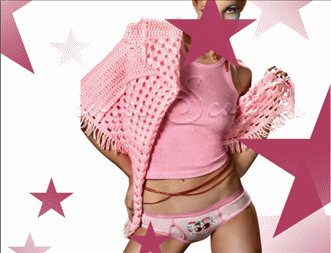
2.:: Copy and paste as a New layer “SM DarnPink Stars overlay stars”
3.:: Copy and paste as a New layer “MichaelRosenCandyGirl-TubedByTYA”
4.:: Re size girl tube to 75% and position it in the center of our background layer.
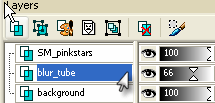
5.:: In the layers Palette we move this tube layer one level down like this:
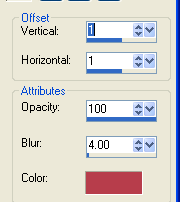
6.::MENU–> ADJUST–> BLUR–> MOTION BLUR by 30
Low Opacity of blur layer tube by 66
7..:: LAYERS–> MERGE VISIBLE
8..:: EFECTS–>3D EFFECTS–>BUTTONIZE–>COLOR #b24264
9..::Copy and Paste as a new “MichaelRosenCandyGirl-TubedByTYA”
10..: Resize tube by 75% and re position to the left of your tag.
11..: EFFECTS–> 3D EFFECTS–> DROP SHADOW color #6d4443
12..: EFFECTS–> 3D EFFECTS–> DROP SHADOW color #6d4443
13..: Copy and paste as a NEW LAYER “Ribbon Xw2”
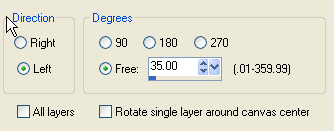
14..: MENU–> IMAGE–> FREE ROTATE LEFT BY 35
15..: In the layers palette drag this “ribbon layer one level down.
This is how our layer palette and tag look so far:
16..: In the layers palette –>add a NEW LAYER
right on top of the “Pink Square layer”
Select BRUSH TOOL and “Tip Brush Yoka-les-Irina-uurwerk”
Color ##6d4443 and apply brush with this settings:
![]()
And Apply
17..: Add a text with a font of your choice :
My original creation in 2005 had the font “COFFEESHOP”

Which is a commercial font . For this revision I had change
To ‘INCARNATION” which is a free share font.
You decide which one you would like to use.
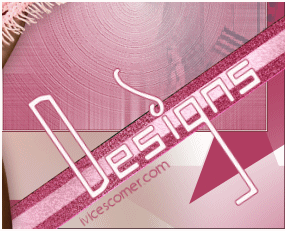
18..: My font settings: Text in vector form
FOREGROUND: #b14063
BACKGROUND: #ffffff
STROKE: 0.5
SIZE: 65 pixels#6d4443
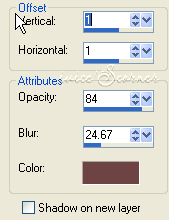
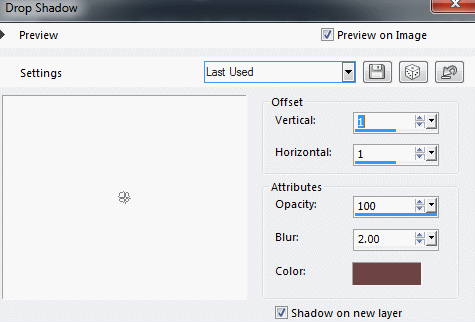
19..: Drop Shadow , Color :#6d4443 with these settings:
..:: STEP 3
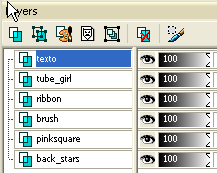
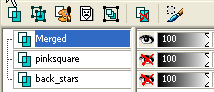
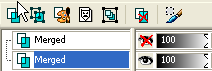
1..: This is how our layer palette looks so far
We are going to create 2 different files from these layers:
2..:In the layer palette close the visibility of
“back_stars” AND “Pinksquare” layers
And we merge the rest of layers into one:
LAYERS–>MERGE–>MERGE VISIBLE
3..: Save as Animation Shop *psp file
Name it : PINK TUBES
4..: Close the visibility of this “Pink tube merged layer”
Open the visibility of the other two left
“back_stars and Pinksquare” layers
MERGE–>MERGE VISIBLE
5..:Save as Animation Shop*psp file
Name it: “PINK _BACK”
Now we have 3 files. We will bring them into animation shop
To put them together:
“Pink _square, Pink_tubes, Pink_back”
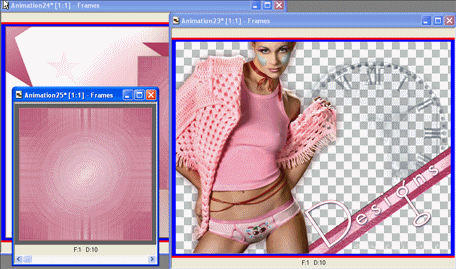
ANIMATION SHOP 3
1.:: OPEN files in Animation Shop:
“Pink _square, Pink_tubes, Pink_back”
2..:: Duplicate “Pink tubes” and “Pink back”
So get to have 2 frames on each one
as we do have already in “Pink_square”
3.:: SELECT frames of “Pink_square”
EDIT –> SELECT ALL–>COPY
4.:: And paste it into “Pink_back” like this:
EDIT–>SELECT ALL–>
EDIT–> PASTE INTO SELECTED FRAME
This is what we will have :

5..:: Select “Pink_tubes” frames
EDIT–>SELECT ALL–>COPY
6..:: And paste them into the animation we are creating:
EDIT–>SELECT ALL–>PASTE INTO SELECTED FRAME
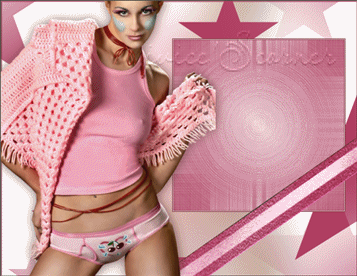
And we are done!
Save as a GIF .
If you would like to share your results with me,
You are more than welcome to post them in my
FACEBOOK PAGE
I would so love to see them 
loVE iS tHe WaY !
![]()
 English
 Spanish
 Dutch
Dutch
0 comments
No comments yet