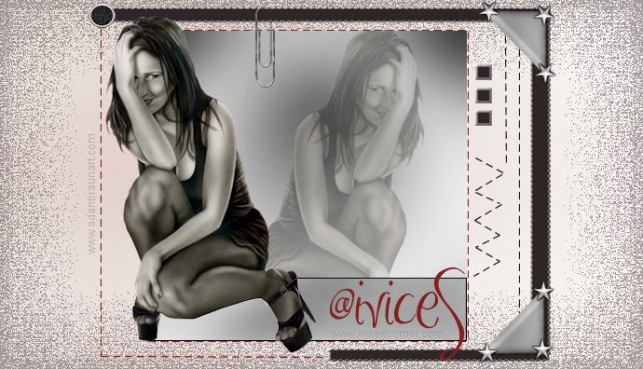
Tag Tutorial created by ®ivice2006
Last Updated: May 2017
Level: Intermediate.
Tools: PSP9 and Animation Shop3.
Targeting: The use of Scrapbook accents.
All materials included *
Tested in PSPX and Corel PSPX7
..:: TERMS OF USE :
The materials I use belong to the artist who created,
Please don’t change the name or use them for your own tutorials.
..:: MATERIALS ZIP
Donwload here♥
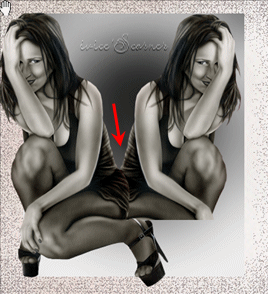
- Tube- AdamBraunKneelingConnyTube
- Background- ivicescorner_ background_pink
- Accents- ivices_blackaccents
- Accents- CANT_METAL_BYMARCINHA
- Acents- BT_METAL_BYMARCINHA
- Tube- RaeRae_RetroDays_Paperclip3
- Gradient -Grey accent
- Selection- ivices_selec1
Font MA Sexy can be Download HERE
Install Gradient and Selection provided in your PSP folders.
..:: STEPS
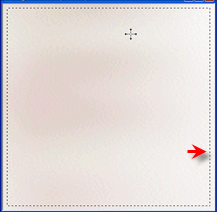
1..:: Open “ivicescorner_ backgroundpink”
Size is 500×450 pixels
2..:: In the layer palette ADD A NEW RASTER LAYER
ELECTIONS–>SELECT ALL
3..:: With the SELECTION TOOL Draw a rectangle
like this
4..:: MENU SELECTIONS–>INVERT
5..:: In the Color palette set FOREGROUND color to #655557
Flood fill the border selection with this color
and SELECTION–>SELECT NONE
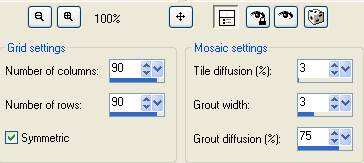
6..:: EFFECTS–>TEXTURE EFFECTS –>MOSAIC ANTIQUE
7…:: Low the OPACITY of this layer to 56%
8…:: MERGE –>MERGE VISIBLE
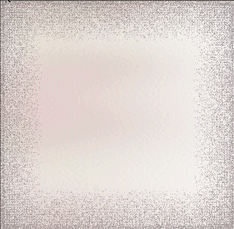
This is what we have so far
9..:: In the layer palette ADD A NEW RASTER LAYER
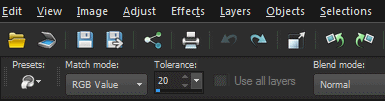
SELECTIONS->LOAD SELECTION “ivice_select1” from disk
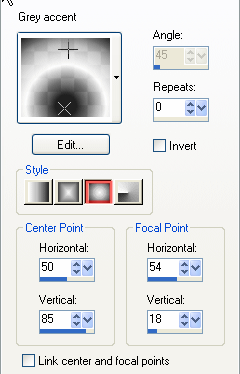
10..:: In the Color palette chose “Grey accent” gradient
and flood fill the selection using this settings
NOTE: If you are using Corel PSPX7 be sure to uncheck
“Use all layers” option in the flood fill settings toolbar
11…:: With the selection still running in this gradient layer
MENU ADJUST –>BLUR->Gaussian Blur 35
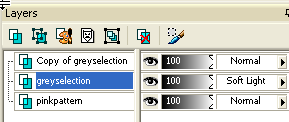
12…::DUPLICATE and in the layers palette
Click over original gradient layer and change its
BLEND MODE to Soft light
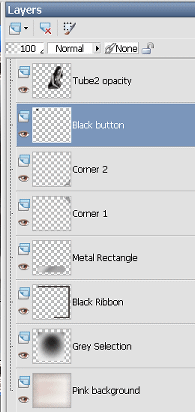
This how our layers palette look so far
13…:: SELECTIONS–>SELECT NONE
LOCK the VISIBILITY of layer “pink background”
and MERGE VISIBLE the “grey and copy of grey layers”
14…:: Copy and paste AS A NEW LAYER “tube de Adam Braun”
re size the tube at 65%
15…:: MENU ADJUST –>HUE AND SATURATION–>
COLORIZE : Hue:0
Saturation:5
16…:: Using Selection tool let’s select ¾ of the tube
17…:: Copy and paste this selection as NEW LAYER
IMAGE–>MIRROR
18…:: Low the OPACITY of this layer to 34%
AND DRAG this layer one level down to put it
under the original tube.

19…:: Open : “ivice_black accents tube” provided in the zip.
Copy and paste as NEW LAYER the black ribbon: ” ivice_black ribbon”
20…:: Open “CANT_METAL_BYMARCINHA” provided in the zip
Copy and paste AS NEW LAYER the metal rectangle.
using the PICK TOOL re size as needed and put into it’s position
21…:: Copy and paste as well one of the metal corners
and Re size it at 65%
22…::DUPLICATE THIS LAYER of the metal corner and
Use IMAGE –>MIRROR to put it into place
23…:: Open : “BT_METAL_BYMARCINHA” (black buttons)
Copy and Paste one of the black buttons AS NEW LAYER
(Resize at 45%)
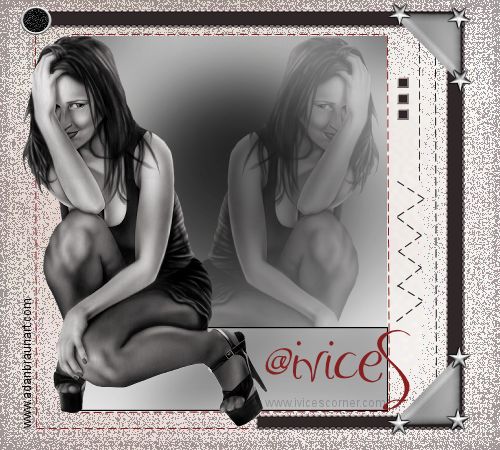
This is how our tag looks now:
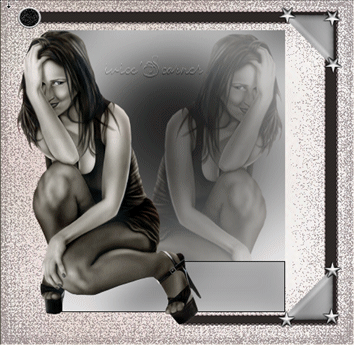
24…:: Relocate all the embellishments into it’s position
Let’s organize layers so the principal tube is always on top
25…::Copy and paste as NEW LAYER “ivice_black squares”
with the MOVE TOOL place them into position (see original tag)
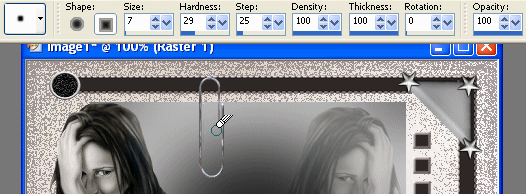
26…:: Open : “RaeRae_RetroDays_Paperclip3”
Copy and Paste AS NEW LAYER (Resize at 75%)
27…:: With ERASE TOOL in this settings:
Let’s remove part of the metal clip so it looks like is holding the tag
OPTIONAL STEP: LOCK THE VISIBILITY of principal tube layers
and MERGE VISIBLE the rest of layers
28…:: In the layers Palette ADD NEW RASTER LAYER
Set FOREGROUND to color #862020
and LOCK THE BACKGROUND
29…:: Select the PEN TOOL –> SMALL DASHED STYLE
with this settings:
![]()
31…:: Let’s draw lines to decorate the the tag (see tag above)
In case you are not familiar with the Pen tool read the TIPS*
at the end of this page.
32…:: Change FOREGROUND color at #1e1616
And let’s draw some more lines. You can choose different line styles
and play with the design as well I draw zig zag lines as well.
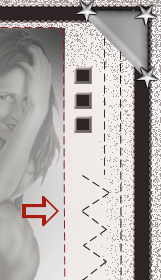
32…:: Make sure to convert the vector layers into RASTER LAYERS
and to position them below your Girl original tube.
33…:: Add respective credits and your signature
I had updated this Tutorial using the
free share font “MA SEXY”color #862020
And is done!
If you would like to share your results with me,
You are more than welcome to post them in my
FACEBOOK PAGE
I would so love to see them 
loVE iS tHe WaY !
![]()
..:: IMPORTANT TIPS*
To create the Dotted lines with the PEN TOOL
just click in the area where you want to start a line
and drag the mouse to the area where you want this to finish.
You gotta repeat this step for every line you draw,
every single line needs a start and an end point.
The lines will be created as VECTOR LAYERS
once you have what you want
CONVERT this vector layer into a RASTER LAYER.
I would recommend to create a new Vector layer for each group of lines.
In my case I had 3 vector layers , one vector for each of :
-Lines around the grey gradient square,
-Lines around the tag connecting the ribbon,
-Zig zag lines in the right side of the tag.
 English
 Spanish
 Dutch
Dutch
0 comments
No comments yet