

Tag Tutorial created by ®ivice2007
Last Updated: May 2017
Level: Intermediate.
Tools: PSPX and Plugin VMTools
Targeting: Selections and blending modes
All materials included *
Tested in Corel PSPX7
..:: TERMS OF USE :
The materials I use belong to the artist who created,
Please don’t change the name or use them for your own tutorials.
..:: MATERIALS ZIP
Donwload here♥
- Background- Aimelle-misted tube_infinity-v2
- Tube- wb_pink
- Accents- ivice_text1
- Accents- ivice_text1
- Gradient- Duotone lavender
- Selection- ivices_run_selec0
- Selection- ivices_run_selec1
Plugin VM TOOLBOX can be downloaded HERE
Font Juergen can be Download HERE
Install Gradient and Selections provided in your PSP folders.
..:: STEPS
1..:: Make a new Transparent image 500×450 pixels
2..:: In the layer palette SET GRADIENT “Duotone Lavender”
and FLOOD FILL the image with this settings:
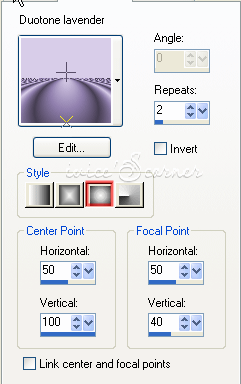

TIP: To be able to customize the settings like mine
Un check the box “link center and focal points”
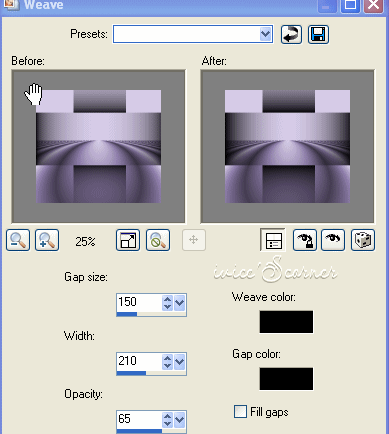
3..:: MENU EFFECTS–>TEXTURE EFFECTS–>WEAVE
(Fill gaps box–>un check)
4..:: Select MENU —> SELECTIONS–>LOAD/SAVE SELECTION
look for “ivices_run_selec0” and apply
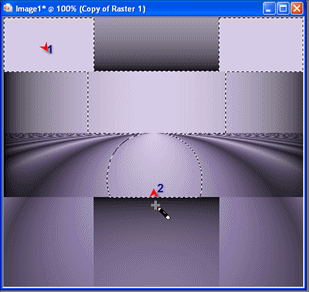
5..:: With selection running
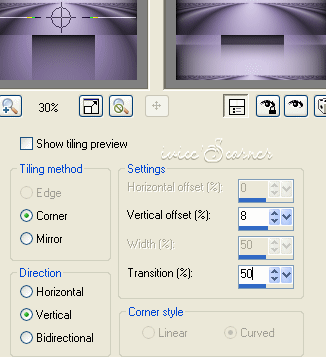
MENU EFFECTS–>IMAGE EFFECTS–>SEAMLESS TILING
6..:: We are going to load another selection:
MENU–> SELECTION–> LOAD/SAVE SELECTION
look for “ivices_run_selec1”
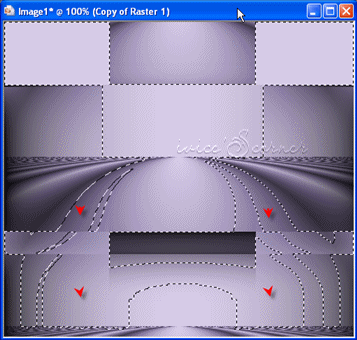
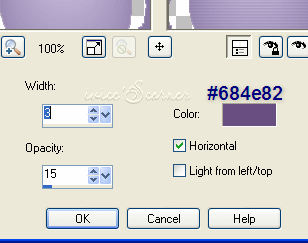
7..: With the selection still running:
MENU EFFECTS–>TEXTURE EFFECTS->BLINDS
Color #684e82
8..: MENU SELECT–>SELECT NONE
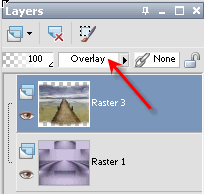
9..: Copy and paste as a NEW LAYER “Aimelle misted tube infinity”
in the layers palette change BLEND MODE TO OVERLAY
10..: Copy and paste as NEW LAYER “tube wb_pink”
Resize to 85% (resample bicubic)
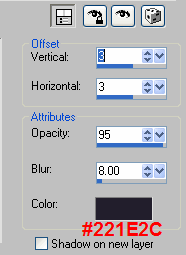
11..: MENU EFFECTS–>3D EFFECTS–>DROP SHADOW
Color # 221E2C
12..: In the layers palette Click on the layer Background
to activate it
Copy and Paste AS A NEW LAYER “ivice_text1”
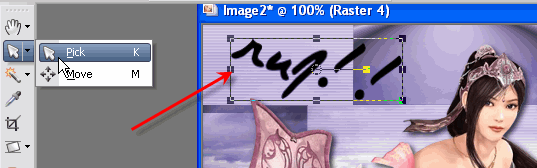
13..:Using PICK TOOL let’s move the text into it’s position
TIP: CLICK “M” in your keyboard to deactivate PICK TOOL )
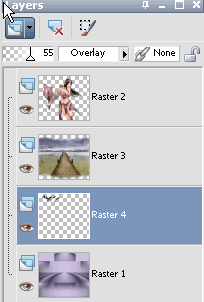
14..: In the layer palette set BLEND MODE to overlay
TRASPARENCY TO 55%
15..: Copy and Paste AS NEW LAYER “ivice_text2”
with the PICK TOOL move into it’s position
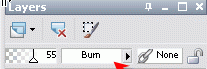
Set BLEND MODE TO BURN , TRANSPARENCY 55%
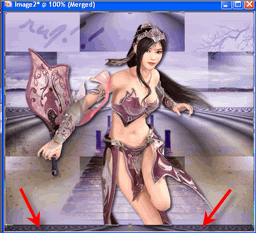
16..: MENU–>LAYERS–>MERGE VISIBLE
Using CROP TOOL let’s cut a bit of the inferior margin
it doesn’t look very good in there
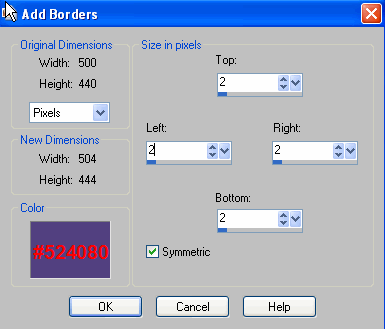
17..: MENU IMAGE–>ADD BORDER->2 pixels
color # 524080
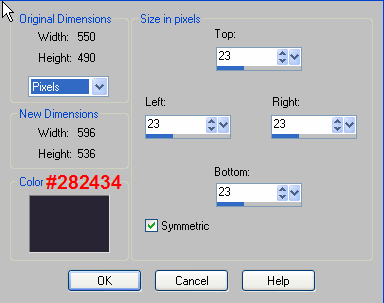
18..: MENU IMAGE –>ADD BORDER –> 23 pixels
Color #282434
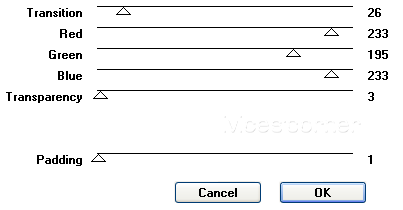
19..: MENU EFFECTS–>PLUGINS–>VM TOOLBOX –>SOFTBORDER
with this settings:
And it’s ready. Add your signature, proper credits and you are done!
If you would like to share your results with me,
You are more than welcome to post them in my
FACEBOOK PAGE
I would so love to see them 
loVE iS tHe WaY !
![]()
 English
 Spanish
 Dutch
Dutch
0 comments
No comments yet